用nginx实现一个直播服务 |
您所在的位置:网站首页 › ffmpeg 关闭推流 › 用nginx实现一个直播服务 |
用nginx实现一个直播服务
|
目录 一、环境准备 二、安装编译nginx所需的安装包和下载nginx原代码包 三、nginx配置 四、启动nginx服务 五、测试推流和拉流服务 六、摄像头数据采集 七、查看统计 这篇文章主要记录用nginx实现直播服务,通过RTMP推流和通过HTTP-FLV或RTMP拉流,并在页面中播放。 一、环境准备CentOS Linux release 7.3.1611 (Core) 3.10.0-514.el7.x86_64 nginx1.25 二、安装编译nginx所需的安装包和下载nginx原代码包#安装编译nginx环境包 yum install gcc -y yum install pcre pcre-devel -y yum install openssl openssl-devel -y yum install wget -y#下载nginx和nginx-http-flv-module原代码 mkdir -p /opt/backup/docker-build/nginx-flv/nginx-src cd /opt/backup/docker-build/nginx-flv/nginx-src wget http://nginx.org/download/nginx-1.25.0.tar.gz tar -zxf nginx-1.25.0.tar.gz git clone https://github.com/winshining/nginx-http-flv-module.git#编译安装,完成后会安装在/usr/local/nginx-flv下 ./configure --prefix=/user/local/nginx-flv --with-http_ssl_module --with-http_secure_link_module --add-module=nginx-http-flv-module-master make make install 三、nginx配置#nginx主配置文件 vim /usr/local/nginx-flv/conf/nginx.conf #user nobody; worker_processes auto; #error_log logs/error.log; #error_log logs/error.log notice; #error_log logs/error.log info; error_log logs/error.log warn; pid logs/nginx.pid; events { worker_connections 10240; use epoll; multi_accept on; } http { include mime.types; default_type application/octet-stream; server_names_hash_bucket_size 128; client_header_buffer_size 32k; large_client_header_buffers 4 32k; client_max_body_size 50m; log_format nginx_json '{ "time": "$time_local", ' '"remote_ip": "$remote_addr", ' '"remote_user": "$remote_user", ' '"domain":"$host", ' '"responsetime":$request_time, ' '"request": "$request", ' '"response": "$status", ' '"bytes": $body_bytes_sent, ' '"referrer": "$http_referer", ' '"upstreamtime":"$upstream_response_time", ' '"upstreamaddr":"$upstream_addr", ' '"x_forwarded_for":"$http_x_forwarded_for", ' '"agent": "$http_user_agent" }'; access_log logs/access.log nginx_json; sendfile on; tcp_nopush on; server_tokens off; keepalive_timeout 65; gzip on; gzip_min_length 1k; gzip_buffers 4 16k; gzip_http_version 1.0; gzip_comp_level 2; gzip_types text/plain application/x-javascript text/css application/xml; gzip_vary on; client_header_timeout 10; client_body_timeout 10; client_body_buffer_size 10K; proxy_buffering off; reset_timedout_connection on; send_timeout 10; charset utf-8; server { listen 80; server_name localhost; #charset koi8-r; #access_log logs/host.access.log main; location / { root html; index index.html index.htm; } #error_page 404 /404.html; # redirect server error pages to the static page /50x.html # error_page 500 502 503 504 /50x.html; location = /50x.html { root html; } location /live { flv_live on; chunked_transfer_encoding on; #支持'Transfer-Encoding: chunked'方式回复 add_header 'Access-Control-Allow-Origin' '*'; #添加额外的HTTP头 add_header 'Access-Control-Allow-Credentials' 'true'; #添加额外的HTTP头 } location /flv { flv_live on; chunked_transfer_encoding on; add_header 'Access-Control-Allow-Origin' '*'; add_header 'Access-Control-Allow-Credentials' 'true'; #添加额外的HTTP头 } location /stat { #推流播放和录制统计数据的配置 rtmp_stat all; rtmp_stat_stylesheet stat.xsl; } location /stat.xsl { root html; #指定 stat.xsl 的位置 } #如果需要 JSON 风格的 stat, 不用指定 stat.xsl #但是需要指定一个新的配置项 rtmp_stat_format #location /stat { # rtmp_stat all; # rtmp_stat_format json; #} } }#flv.conf配置文件 mkdir -p /usr/local/nginx-flv/conf/conf.d cd /usr/local/nginx-flv/conf/conf.d vim flv.conf rtmp_auto_push on; rtmp_auto_push_reconnect 1s; rtmp_socket_dir /tmp; rtmp { out_queue 4096; out_cork 8; max_streams 128; timeout 15s; drop_idle_publisher 15s; log_interval 5s; #interval used by log module to log in access.log, it is very useful for debug log_size 1m; #buffer size used by log module to log in access.log server { listen 1935; application live { #开启直播 live on; record off; #可以把转完码的视频放在这个文件里,这样可以拉这个视频进行播放 #play /opt/video; # 允许从任何源push流 allow publish all; # 允许从任何地方来播放流 allow play all; # 20秒内没有push,就断开链接。 drop_idle_publisher 20s; ##打开 GOP 缓存,减少首屏等待时间 gop_cache on; } } } 四、启动nginx服务 #检测配置文件语法,如果正常,提示(syntax is ok) /usr/local/nginx-flv/sbin/nginx -t #运行 /usr/local/nginx-flv/sbin/nginx -c /usr/local/nginx-flv/conf/nginx.conf 五、测试推流和拉流服务#推流服务 可以在本地服务器下载安装ffmpeg后,读取一个mp4文件,推流到上面搭建的直播服务,来进行试验。 命令如下,test-video.mp4就是你本地的视频文件名称,live是前面配置的application名称,test就是自定义的流名称。 注意 一些旧版本的 FFmpeg 不支持选项 -c copy,可以使用选项 -vcodec copy -acodec copy 替代。 appname 用于匹配 rtmp 配置块中的 application 块,具体可以参考(nginx-http-flv-module: 基于nginx-rtmp-module的流媒体服务器。具备nginx-rtmp-module的所有功能,增加了HTTP-FLV,GOP缓存和VHOST(一个IP对应多个域名)的功能。Media streaming server based on nginx-rtmp-module. In addtion to the features nginx-rtmp-module provides, HTTP-FLV, GOP cache and VHOST (one IP for multi domain names) are supported now.)。 streamname 可以随意指定,但是不能省略。 RTMP 默认端口为 1935,如果要使用其他端口,必须指定 :port。 ffmpeg -re -i test-video.mp4 -c copy -f flv rtmp://192.168.10.111:1936/live/test#看到如下信息,就是开始推流了 fmpeg version 3.4.11-0ubuntu0.1 Copyright (c) 2000-2022 the FFmpeg developers built with gcc 7 (Ubuntu 7.5.0-3ubuntu1~18.04) configuration: --prefix=/usr --extra-version=0ubuntu0.1 --toolchain=hardened --libdir=/usr/lib/x86_64-linux-gnu --incdir=/usr/include/x86_64-linux-gnu --enable-gpl --disable-stripping --enable-avresample --enable-avisynth --enable-gnutls --enable-ladspa --enable-libass --enable-libbluray --enable-libbs2b --enable-libcaca --enable-libcdio --enable-libflite --enable-libfontconfig --enable-libfreetype --enable-libfribidi --enable-libgme --enable-libgsm --enable-libmp3lame --enable-libmysofa --enable-libopenjpeg --enable-libopenmpt --enable-libopus --enable-libpulse --enable-librubberband --enable-librsvg --enable-libshine --enable-libsnappy --enable-libsoxr --enable-libspeex --enable-libssh --enable-libtheora --enable-libtwolame --enable-libvorbis --enable-libvpx --enable-libwavpack --enable-libwebp --enable-libx265 --enable-libxml2 --enable-libxvid --enable-libzmq --enable-libzvbi --enable-omx --enable-openal --enable-opengl --enable-sdl2 --enable-libdc1394 --enable-libdrm --enable-libiec61883 --enable-chromaprint --enable-frei0r --enable-libopencv --enable-libx264 --enable-shared libavutil 55. 78.100 / 55. 78.100 libavcodec 57.107.100 / 57.107.100 libavformat 57. 83.100 / 57. 83.100 libavdevice 57. 10.100 / 57. 10.100 libavfilter 6.107.100 / 6.107.100 libavresample 3. 7. 0 / 3. 7. 0 libswscale 4. 8.100 / 4. 8.100 libswresample 2. 9.100 / 2. 9.100 libpostproc 54. 7.100 / 54. 7.100 Input #0, mov,mp4,m4a,3gp,3g2,mj2, from 'test-video.mp4': Metadata: major_brand : isom minor_version : 512 compatible_brands: isomiso2avc1mp41 encoder : Lavf57.56.101 Duration: 00:01:25.27, start: 0.000000, bitrate: 166 kb/s Stream #0:0(und): Video: h264 (High) (avc1 / 0x31637661), yuv420p(tv, bt709), 1280x638, 156 kb/s, 29.01 fps, 29 tbr, 1000k tbn, 2000k tbc (default)#拉流测试 windwos下拉RTMP流可以下载一个VLC播放器,会比较方便 #RTMP拉流地址 #自定流,要看推流时取的名字。我前面取的是test,那这边就取test rtmp://192.168.10.111:1936/live/test
注意 如果使用 ffplay 命令行方式播放流,那么必须为上述的 url 加上引号,否则 url 中的参数会被丢弃(有些不太智能的 shell 会把 "&" 解释为"后台运行")。 如果使用 flv.js 播放流,那么请保证发布的流被正确编码,因为 flv.js 只支持 H.264 编码的视频和 AAC/MP3 编码的音频。 参数 dir 用于匹配 http 配置块中的 location 块 HTTP 默认端口为 80, 如果使用了其他端口,必须指定 :port。 RTMP 默认端口为 1935,如果使用了其他端口,必须指定 port=xxx。 参数 app 的值(appname)用来匹配 application 块,但是如果请求的 app 出现在多个 server 块中,并且这些 server 块有相同的地址和端口配置,那么还需要用匹配主机名的 server_name 配置项来区分请求的是哪个 application 块,否则,将匹配第一个 application 块。 参数 stream 的值(streamname)用来匹配发布的流的名称。 六、摄像头数据采集#以windows为例,查询本机的音视频采集设备,前提需要安装ffmpeg程序 ffmpeg -list_devices true -f dshow -i dummy#推流摄像头和麦克风内容,USB2.0 PC CAMERA和麦克风 (USB2.0 MIC)是上面查询的结果。 ffmpeg -f dshow -i video="USB2.0 PC CAMERA":audio="麦克风 (USB2.0 MIC)" -vcodec libx264 -acodec aac -f flv "rtmp://192.168.10.111:1936/live/test" 七、查看统计#前提需要在nginx主配置文件里配置了stat服务,并且需要在nginx-http-flv-module-master源码包里把统计代码stat.xsl文件copy到nginx配置的目录里 http://192.168.10.111:89/stat
|

 #HTTP-FLV 拉流方式测试
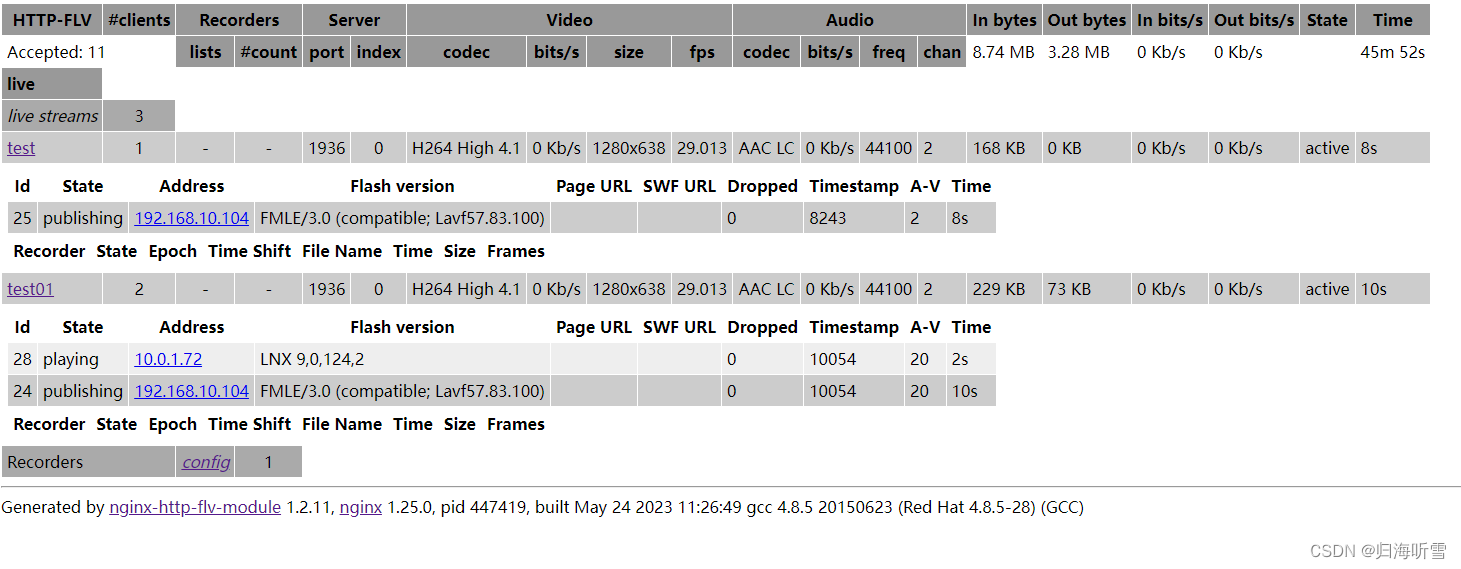
【本文地址】
今日新闻 |
推荐新闻 |